Friday, November 12, 2010

Sharepoint 2010 Shared Services Trusts

First what is Application Services sharing... simply put it allows you to configure a service application such Managed Metadata in 1 farm say a Staging Farm or Authoring Farm and use the same database/configuration etc in a Production environment.... This cuts down on maintenance, configuration tasks, and the daunting portions of rentering mass custom settings or in this case keywords etc.

Ok...there's very little out there on doing this and while TechNet does a great job detailing creating the trust it leaves out an extremely important part that the trusts will not work without....  You will recieve this error when trying to consume a published resource

"Unable to connect to the specified address. Verify the URL you entered and contact the service administrator for more details.”

Luckily I ran across this single post ( http://www.harbar.net/archive/2010/05/03/service-application-federation-with-sharepoint-2010.aspx )

So I've compiled the 2 sets of information to get you to where you need to be in setting up the trusts to use shared service applications between farms.  FYI - this uses PowerShell and cannot be done via GUI until you reach the establishing trust section


Create Trust between farms

To export the root certificate from the consuming farm
  1. On the Start menu, click Administrative Tools.
  2. Click SharePoint 2010 Management Shell.
  3. At the Windows PowerShell command prompt, type each of the following commands:
$rootCert = (Get-SPCertificateAuthority).RootCertificate
$rootCert.Export("Cert") | Set-Content e:\Prod.cer -Encoding byte
To export the STS certificate from the consuming farm
  1. At the Windows PowerShell command prompt, type the following commands:
$stsCert = (Get-SPSecurityTokenServiceConfig).LocalLoginProvider.SigningCertificate
$stsCert.Export("Cert") | Set-Content E:\ProSTS.cer -Encoding byte
To export the root certificate from the publishing farm
  1. On the Start menu, click Administrative Tools.
  2. Click SharePoint 2010 Management Shell.
  3. At the Windows PowerShell command prompt, type the following commands:
$rootCert = (Get-SPCertificateAuthority).RootCertificate
$rootCert.Export("Cert") | Set-Content E:\Authoring.cer -Encoding byte
To copy the certificates
  1. Copy the root certificate and the STS certificate from the server in the consuming farm to the server in the publishing farm.
  2. Copy the root certificate from the server in the publishing farm to a server in the consuming farm.
To import the root certificate and create a trusted root authority on the consuming farm
  1. At the Windows PowerShell command prompt on a server in the consuming farm, type the following commands:
$trustCert = Get-PfxCertificate
New-SPTrustedRootAuthority Authoring -Certificate $trustCert

To establish trust by using Central Administration
  1. Verify that the user account that is performing this procedure is a member of the Farm Administrators SharePoint group.
  2. On the SharePoint Central Administration Web site, click Security.
  3. On the Security page, in the General Security section, click Manage trust.
  4. On the Trust Relationship page, on the ribbon, click New.
  5. On the Establish Trust Relationship page:
    1. Supply a name that describes the purpose of the trust relationship.
    2. Browse to and select the Root Authority Certificate for the trust relationship. This must be the Root Authority Certificate that was exported from the other farm by using Windows PowerShell.
    3. If you are performing this task on the publishing farm, select the check box for Provide Trust Relationship. Type in a descriptive name for the token issuer and browse to and select the STS certificate that was copied from the consuming farm.
    4. Click OK.
After a trust relationship is established, you can modify the Token Issuer description or the certificates that are used by clicking the trust, and then clicking Edit. You can delete a trust by clicking it, and then clicking Delete.

At this point TechNet ends...without the next few commands you will not be able to establish connections to the published resource.  Again a great big thanks to Spencer Harbar
for providing this next section.

Add Remote Farm Permissions

To grant the permissions necessary, on the consumer farm, run the following PowerShell:

(Get-SPFarm).Id
Copy the output. On the publishing farm run the following PowerShell – replacing with the guid from above:

$security = Get-SPTopologyServiceApplication | Get-SPServiceApplicationSecurity


$claimProvider = (Get-SPClaimProvider System).ClaimProvider


$principal = New-SPClaimsPrincipal -ClaimType http://schemas.microsoft.com/sharepoint/2009/08/claims/farmid -ClaimProvider $claimProvider -ClaimValue


Grant-SPObjectSecurity -Identity $security -Principal $principal -Rights "Full Control"

Get-SPTopologyServiceApplication | Set-SPServiceApplicationSecurity -ObjectSecurity $security


Once all of these have been completed successfully you should be able to connect to published applications.  I will try to get a quick note up shortly explaining how to publish and connect

Wednesday, October 13, 2010

Missing Sharepoint 2010 Default Templates??

Super frustrated? Only showing 2 site templates? Wiki and Publishing with workflow? Tried turning on every feature possible at every level? Well...you've come to the right spot to end your frustrations....

1. Go to Site Settings
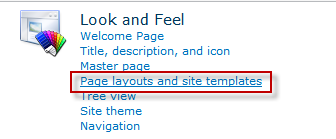
2. Click "Page layouts and site templates" under the Look and Feel section


3. In the top section called "SubSite Templates" you will notice default it is set to subsites can ONLY use the following templates.


4. You can either change radio button to Subsites can use ANY site template or choose certain templates and click add


Tada! You're now in business......

Monday, October 4, 2010

.SWF restrictions 2010/Opening PDF's

Are you unable to add Flash to your Sharepoint 2010 site?  Are you constantly being prompted to download/save a PDF file vs just opening?  Simple solution...

Cause:  Sharepoint 2010 has stronger default restrictions than Moss 2007 and by default does not allow SWF files.

Solution:
1.  Go to Central Administration
2.  Application Management
3.  Highlight the Web Application you are working with.
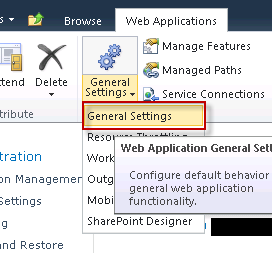
4.  Click General Settings/General Settings


5.  Change Browser File Handling from Strict to Permissive


Refresh and try again.  You should now be able to open PDF's in browser and use SWF files.  If you are still having problems with some libraries this could be due to not inheriting etc and the "Strict" Restriction is not changed.  This can be changed via Powershell script.  Once I validate a script or 2 I will update the post.

Wednesday, September 22, 2010

Cannot Log into Sharepoint Site on the Server

Ok so your sites work fine, you can log into CA no issues however when you try to open your web application on the server it blanks out 3 times and goes to a white page..... 


To resolve this problem, specify the host name. To specify the host names that are mapped to the loopback address and that can connect to Web sites on your computer, follow these steps:
  1. Click Start, click Run, type regedit, and then click OK.
  2. In Registry Editor, locate and then click the following registry key:
    HKEY_LOCAL_MACHINE\SYSTEM\CurrentControlSet\Control\Lsa\MSV1_0
  3. Right-click MSV1_0, point to New, and then click Multi-String Value.
  4. Type BackConnectionHostNames, and then press ENTER.
  5. Right-click BackConnectionHostNames, and then click Modify.
  6. In the Value data box, type the host name or the host names for the sites that are on the local computer, and then click OK.
  7. Exit Registry Editor, and then restart the computer.

This comes from a kb article that seems irrelevent to the issue however it does correct the issue.

KB 956158

Monday, May 17, 2010

Bootable USB or in my case SD Card

My friend got an oh so lovely Gateway LT20 Verizon Netbook. She broke it, standard spyware ya know, so it of course makes it my hands for repair, how lucky :) After some basic cleanups, defrag's and windows updates it is now ready to go home. 1 Final reboot and BAM! recycling Blue Screens ugggh Thank you MS! http://support.microsoft.com/kb/977165 This patch sent the Netbook world into panic. Now I need to reinstall an OS on here....hmmm no cd drive, ok bootable USB here I come. I however did not have a large enough USB to hold an OS so I used an 8GB SD card and a USB card reader.

Many Props go to this guy: http://kmwoley.com/blog/?p=345

It has saved me many of hours and thought I would share.


Using either Vista or Windows 7 to create a bootable USB.

1. Insert your USB (4GB+ preferable) stick to the system and backup all the data from the USB as we are going to format the USB to make it as bootable.

2. Open elevated Command Prompt. To do this, type in CMD in Start menu search field and hit Ctrl + Shift + Enter. Alternatively, navigate to Start > All programs >Accessories > right click on Command Prompt and select run as administrator.

3. When the Command Prompt opens, enter the following command:
DISKPART and hit enter.
LIST DISK and hit enter.
Once you enter the LIST DISK command, it will show the disk number of your USB drive. In the below image my USB drive disk no is Disk 1.

4. In this step you need to enter all the below commands one by one and hit enter. As these commands are self explanatory, you can easily guess what these commands do.
SELECT DISK 1 (Replace DISK 1 with your disk number)
CLEAN
CREATE PARTITION PRIMARY
SELECT PARTITION 1
ACTIVE
FORMAT FS=NTFS
(Format process may take few seconds)
ASSIGN

EXIT
Don’t close the command prompt as we need to execute one more command at the next step. Just minimize it.

5. Insert your Windows DVD in the optical drive and note down the drive letter of the optical drive and USB media. Here I use “D” as my optical (DVD) drive letter and “H” as my USB drive letter.

6. Go back to command prompt and execute the following commands:
D:CD BOOT and hit enter. Where “D” is your DVD drive letter.
CD BOOT and hit enter to see the below message.
BOOTSECT.EXE/NT60 H:

(Where “H” is your USB drive letter)

7. Copy Windows DVD contents to USB.
You are done with your bootable USB. You can now use this bootable USB as bootable DVD on any computer that comes with USB boot feature (most of the current motherboards support this feature).
*** Note that this bootable USB guide will not work if you are trying to make a bootable USB on XP computer.

Tuesday, May 11, 2010

Enable Anonymous Access MOSS 2007

Enabling Anonymous access is easier than baking an apple pie and I would guess if you're enabling this you probably don't bake much....

In Central Admin - Application Management
Select Authentication Providers under Application Security
Choose the Web Application from the dropdown on the upper right you need to change
Click the zone (default, extranet etc)
Check the box to Anonymous Access and Save

Now go to your website
Click Site Actions - Site Settings - Modify all site settings
Click "advanced permissions" under Users and permissions
Click "Settings" on the top toolbar
Click Anonymous Access.

There are 3 options
None
Lists and Libraries and
Entire Site

Tuesday, April 20, 2010

"Empty" vs. "Blank" site collections

Many people believe a "Blank" Site collection equals an "Empty" site collection. This is very untrue. A "Blank" Site Template is just that a Template, one that allows a little more freedom than the rest but still a template none the less.

For Content Deployment your best bet is to use an "Empty" site which can only be accomplished by using the stsadm command as shown below. Using an Empty site collection limits any issues of site formatting caused by using any template.

Syntax
STSADM.EXE -o createsite -url -ownerlogin domain\user -owneremail


Monday, March 8, 2010

How to Create a Site Template

So you've been laboring through trial and error, adding webparts, removing standard links, changing layouts, customizing list and libraries, etc until it is perfect. In fact it is so perfect you want to reuse it over and over again. Well you can without all the pains of rebuilding by following the below simple steps.

Logged in as a Site Admistrator:

1. Click Site Actions
2. Site Settings
3. Under Look and Feel> Save Site as Template


4. On this screen >

Fill in File name (Keep it short, no spaces, single words works best)

Fill in Template Name (this can be more descriptive, but still keep it short 2 - 3 words)

Template Description (here you can go more into detail about your template)


Include Content (use this only if you have custom lists, workflows, content types etc to reuse)

Including content makes your template larger.

(If using including content try to do so before adding data unless necessary or you will be removing data every time this is deployed)


5. Click OK and Success! You can now use it


Friday, March 5, 2010

Use a Site Template to create a Site Collection

There are several great Site Templates out there available for download including MS Fabulous 40 and you can also create your own. The steps to create your own will be outlined later this week.

Normally these are used as subsite templates however they can also be used as a Site Collection template. If you would like to have a standardization across all site collections this is a great way to start!

1. Download or move your site template (.stp) file to your Central Administration server
2. Open a command prompt (start > run > (type) cmd> hit enter)
3. (type) cd c:\"program files"\"common files"\"microsoft shared"\"web server extensions"\12\bin (hit enter)
4. (type) stsadm -o addtemplate -filename (hit enter)
5. After Success message go to Central Administration > Application Management > Create Site Collection
6. You will now see a custom tab under template with your titled template

Thursday, January 7, 2010

2010 Training

http://blogs.msdn.com/arpans/archive/2010/01/07/sharepoint-2010-end-user-training.aspx